
Here's your chance to run the show! Spend the period doing Art Teacher prep.
Here is an outline of the what you need to do...
Requirements:
Cost under $15 for a class of 35 students
Uses tools we have available
Can be completed in two - three sessions
Include: Sample project
List of materials and instructions (include templates, links to images, etc.)
Rubric
( Due Thurs. 11/30, sample due Monday 12/4)
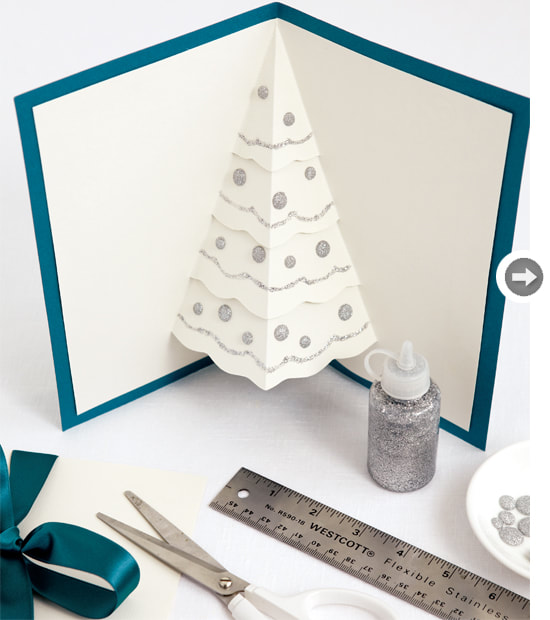
Example
Materials
Directions
1 Using the fold of the white card stock as the centre of the tree, with a pencil, draw half of a triangle, starting just a few millimetres from the top and ending about an inch from the bottom at a width of about 2".
2 Divide the triangle into four horizontal sections and draw a wavy line at each mark. Using scissors, cut along each line. Open and flip the tree shape inside out, reinforcing the fold along the edges so the four sections point
outwards.
3 Using the glue stick, mount this piece onto the blue card stock. Use glitter dome stickers and glitter glue to decorate the tree. Let the glitter glue dry completely before closing the card.
Download printable templates here.
Follow up: What are the origins of this type of craft?
Student evaluation technique.
What are you learning to do that could be used for other purposes?
Here is an outline of the what you need to do...
Requirements:
Cost under $15 for a class of 35 students
Uses tools we have available
Can be completed in two - three sessions
Include: Sample project
List of materials and instructions (include templates, links to images, etc.)
Rubric
( Due Thurs. 11/30, sample due Monday 12/4)
Example
Materials
- 7½" x 10" white card stock (folded in half)
- pencil
- scissors
- glue stick
- 8½" x 11" blue card stock (folded in half)
- silver glitter dome stickers
- silver glitter glue
Directions
1 Using the fold of the white card stock as the centre of the tree, with a pencil, draw half of a triangle, starting just a few millimetres from the top and ending about an inch from the bottom at a width of about 2".
2 Divide the triangle into four horizontal sections and draw a wavy line at each mark. Using scissors, cut along each line. Open and flip the tree shape inside out, reinforcing the fold along the edges so the four sections point
outwards.
3 Using the glue stick, mount this piece onto the blue card stock. Use glitter dome stickers and glitter glue to decorate the tree. Let the glitter glue dry completely before closing the card.
Download printable templates here.
Follow up: What are the origins of this type of craft?
Student evaluation technique.
What are you learning to do that could be used for other purposes?
| holiday_ornament_student_created_lesson_plan_ideas.docx |
 RSS Feed
