Use the above document to create a soft sculpture. You may do just 3 options in your sketchbook however.
www.softsculptureproject-150430103913-conversion-gate02.pdf
www.softsculptureproject-150430103913-conversion-gate02.pdf
|
|
|
Use the above document to create a soft sculpture. You may do just 3 options in your sketchbook however.
www.softsculptureproject-150430103913-conversion-gate02.pdf
0 Comments
Okay, so this isn't easy, BUT this exercise is really a great way to learn to manipulate a two dimensional material (paper) into a 3 dimensional object without using a connection material (glue, tape, staples, etc.). The paper is cut to a 1:2 ratio, (typically 4.5"x 9"), You can use all one color or multiple colors. Create a minimum five letter word, keep it school appropriate! I would like for you to do your name if possible. Remember, no cutting, taping, gluing... just folding. Follow the videos, for your letters, and write your name on the inside of each letter to identify them.. http://www.ultimatepapermache.com/making-an-armature-for-a-paper-mache-figure-sculpture
A sculpture assignment that is large scale using newspaper glue and skewers. One assignment is to create an obstacle for a mini-golf hole using a similar design to the straw towers. Here are some links and videos Unlike other projects, this is not meant to last, but this in no way devalues its importance. The project should enable you to understand how to build a stable structure. Issues of strength and stability are fundamental to the nature of sculpture and are relevant to all types of sculpture, be it carving, modeling, or construction. Before embarking on a making a sculpture, especially one needing an armature, strength and stability is something you should always consider. Search out open structures built using a basic geometric unit, such as a square or triangle, which is repeated over and over again in the structure to provide the necessary support. Since this is a learning project, do not expect success at first try or at every stage. In fact, the more failures you have, the more you learn. Your aim is to find a way to join paper straws together to produce geometric units and use these units to build a stable vertical structure. Planning phase: start by sketching some ideas. Once you have a strong idea, you will need to make 2 dimension-ed drawings one in plan view (from the top indicating the width and length) and one in elevation view (from the side, front, back indicating the height) see examples. 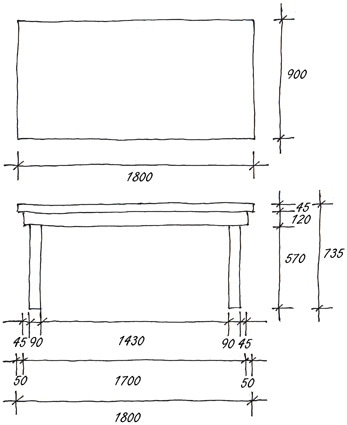 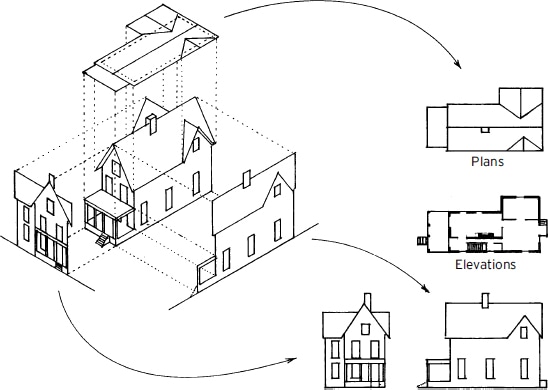
To get practice finding form within an existing shape, we are going to do this stone shape project.
After making the sketchbook with the Japanese side stitch (see button link) Students will study the concept of relief and create a cover design that emphasizes the nature of "heavy textural relief". see powerpoint file.
 Carving and Relief Techniques with Clay, Plaster, Paper, Etc. Carved Relief in clay: transferred from drawing, carved and glazed, then fired as a large tile. https://www.youtube.com/watch?v=FpfQ3jc0d24 Plaster relief cast from wet textured clay mold https://www.youtube.com/watch?v=eMY2MJ-9IAk Printed directions from ArtLex on pouring plaster and carving http://www.artlex.com/ArtLex/p/plaster.lesson1.html How to mix and carve plaster https://www.bigceramicstore.com/info/ceramics/tips/tip44_mixing_pouring_plaster.html EQ #4. How does knowing the contexts, histories, and traditions of art forms help us create works of art and design?
|
|
||||||||


 RSS Feed
